

Have you ever had a project that you wanted to make, but the thought of some portion of it made you procrastinate? This cardigan was like that for me.
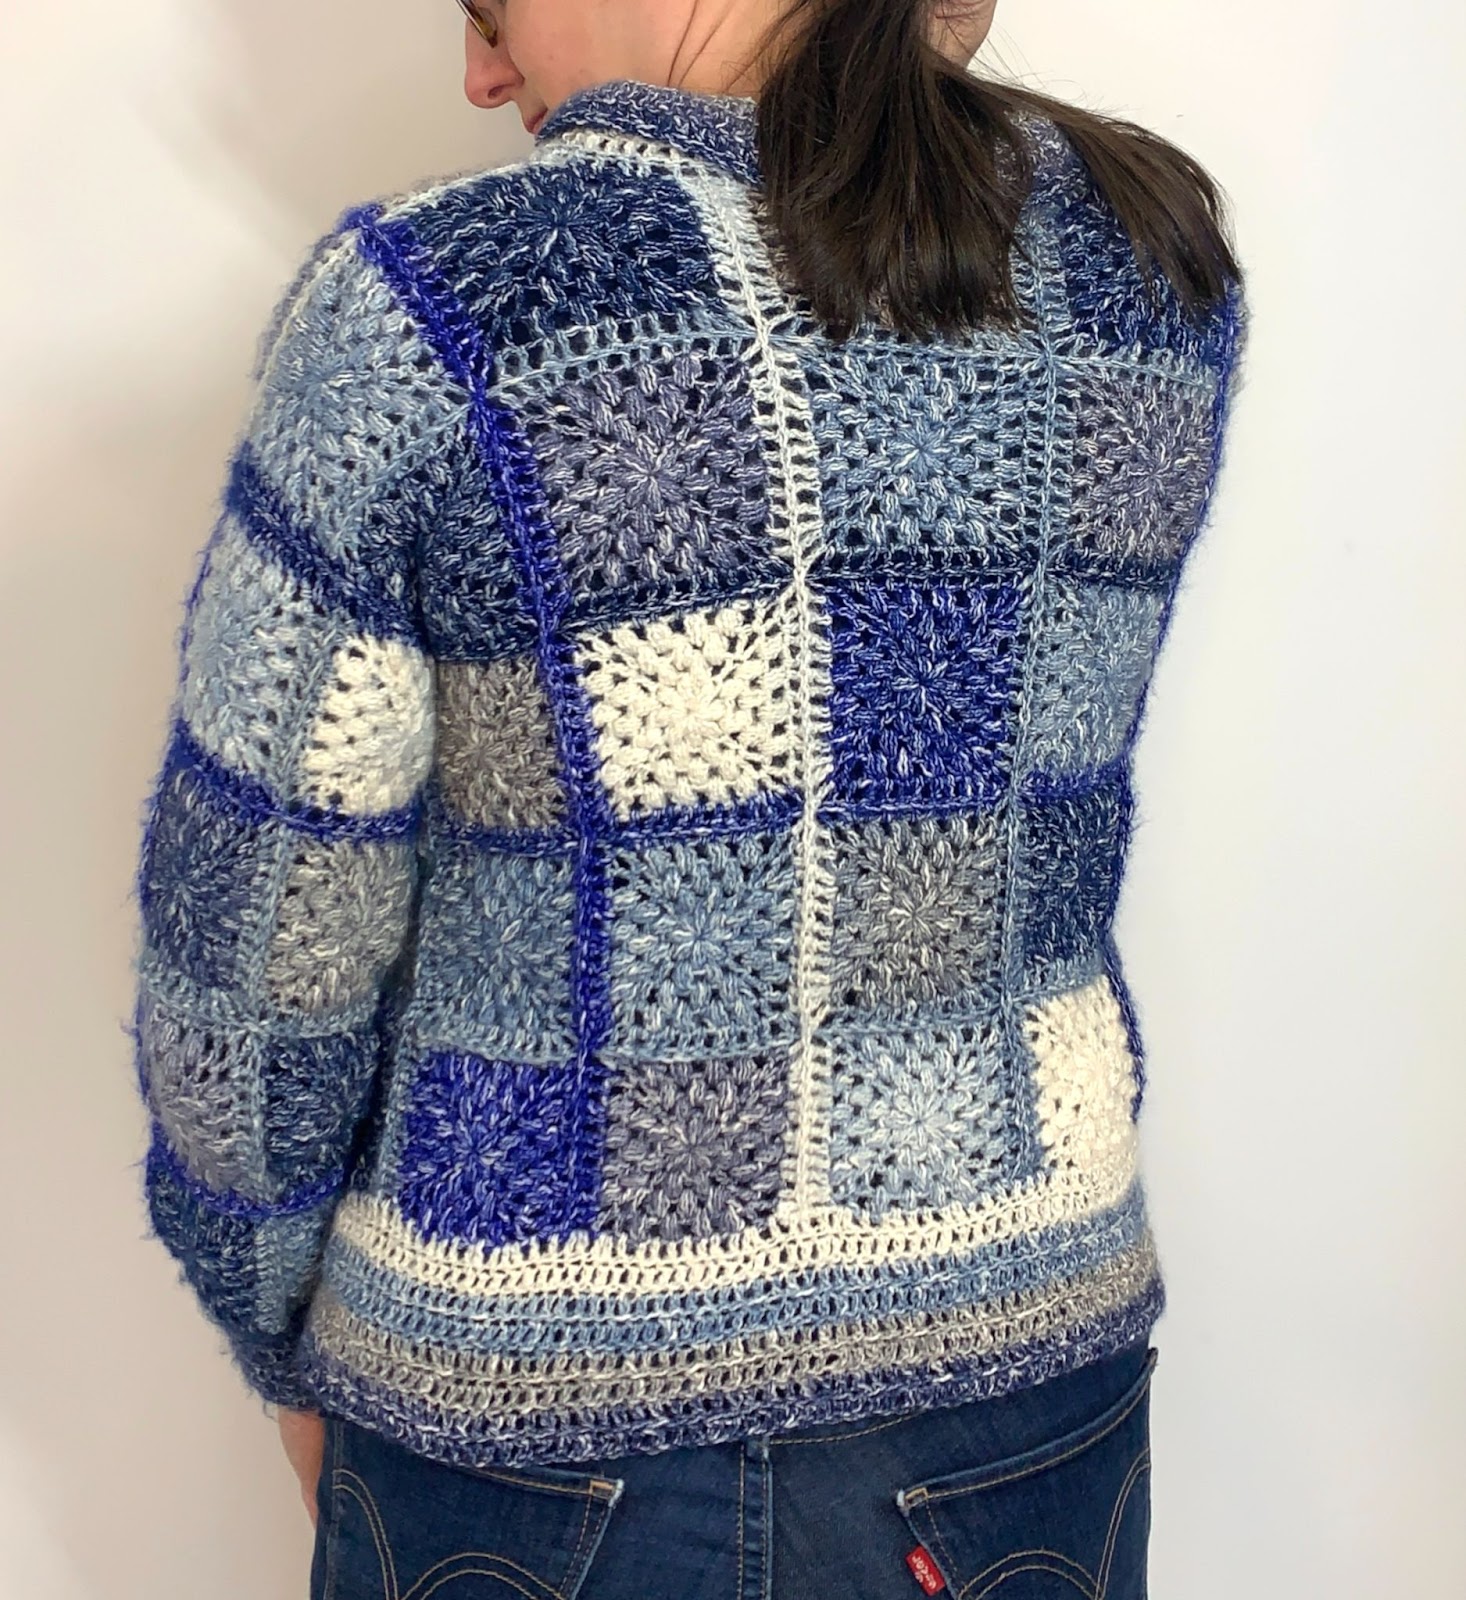
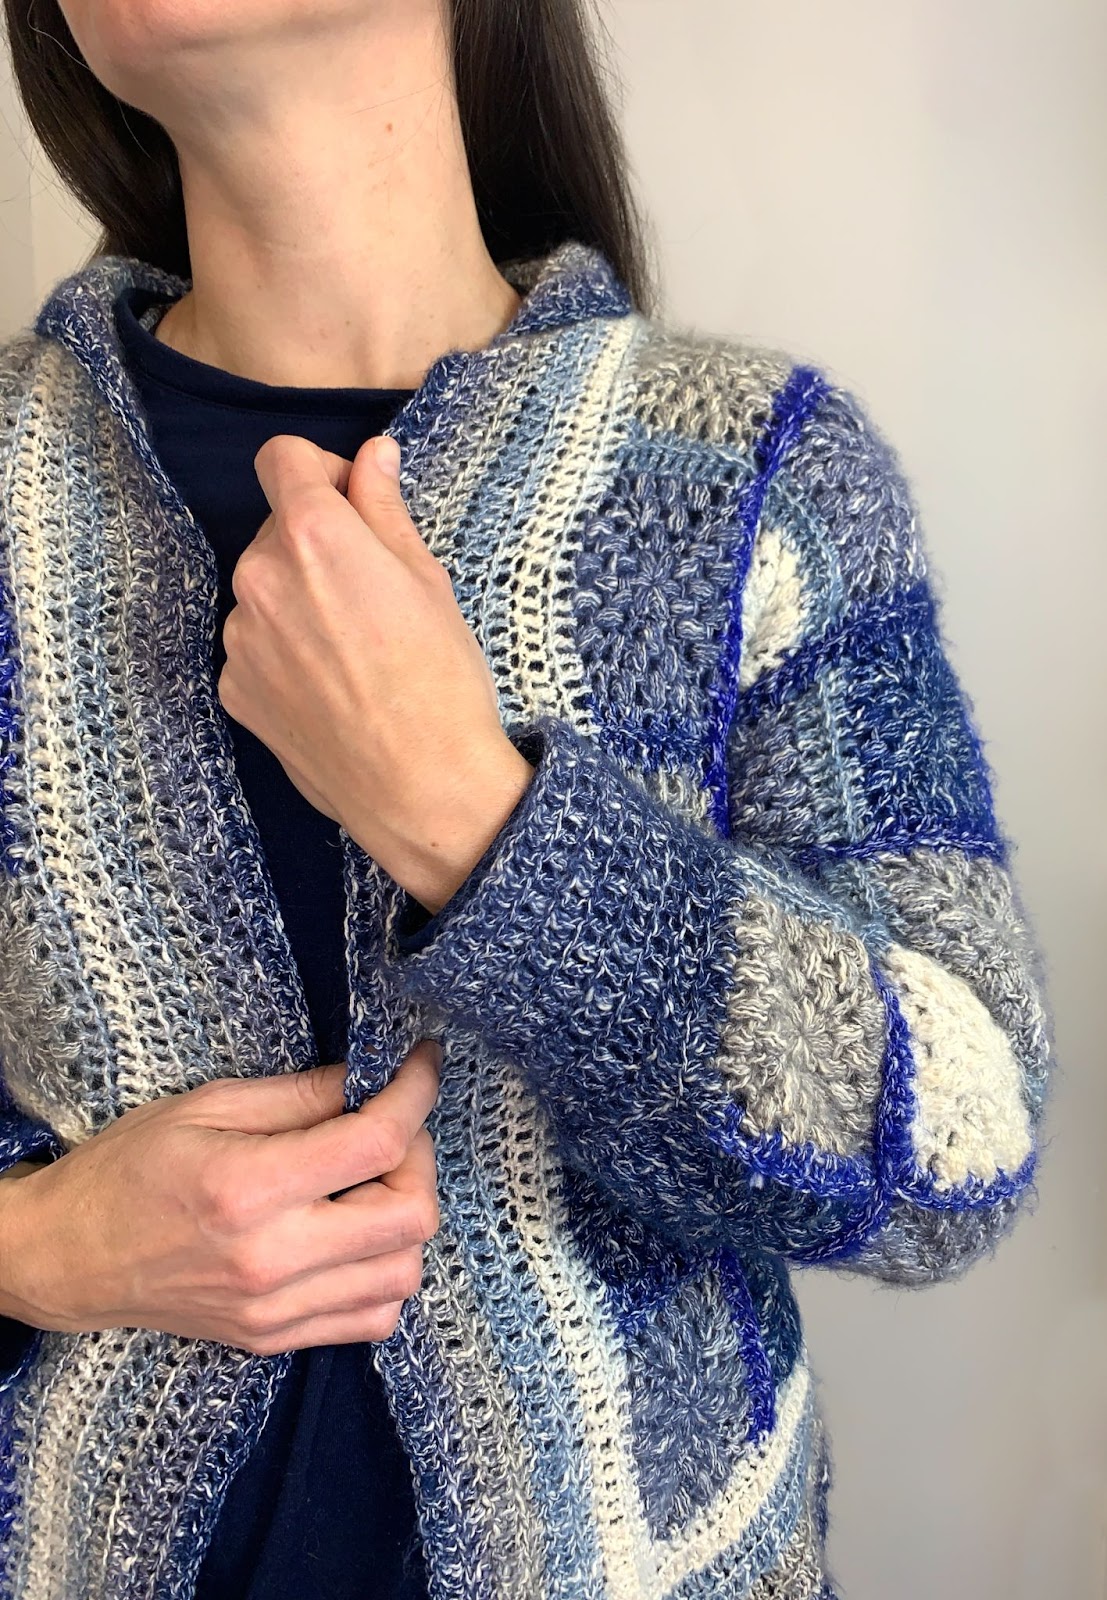
I have seen many granny square cardigans over the years, and think they are cute. Just none of them have really spoken to me as being the one to make. It may be from them being too busy, or just the idea of all the ends to weave end. So, I came up with an idea of making one with a more even texture throughout the square, as a patchwork of similar colors, and each square being of one color.
I found Lion Brand’s Shawl in a Ball that had a nice gradation from white to dark blue. And the shifts were long and subtle. And, when I mean long, I mean LONG! I started making the blocks and loved how each block looked the same color, I had a nice number of different color varieties, a good amount of each one, and all the colors effortlessly worked together.
Once the blocks were finished, that is where my procrastination came in.

note: this page contains affiliate links
The idea of weaving all the ends in made me stop working on this project it for a while. I would find whatever excuse not to work on it. Finally, determined to finish, I sat down one day with a cup of coffee with the resolve to just knock it out. I put some music on and got comfy. I began weaving in the ends of each block prior to joining so that the tails would not be in the way for that step. Low and behold, weaving in the ends didn’t take near as long as I was dreading, and I was done in about the same time I finished my coffee. I do drink it slow, and it gets cold – but it still wasn’t near as long as I was thinking it would.

I pinned all the blocks together in the order I preferred, joined them, and then did the banding. Another very small amount of end weaving was done, and I had finally finished this cardigan.
Once I tried this on Stevie Nicks came to my mind. Wearing it made me feel a little like a free spirit with a homage to the granny square cardigans of the 70’s. I tried to look for an image of her in a crochet cardigan and couldn’t find one. I then came to think maybe it wasn’t so much of her image as her voice in my head singing “You Can Go Your Own Way” for this cardigan.

While the song lyrics are talking about a romance, or lack there of, I am taking this line to mean you can go your own way with your crochet. You can make it how you want. You can wear it how you want. And you can wear it with a little dance in your step and in your heart.
Want to see our other crochet cardigan Weekender Cardigan and Moondance Cardigan

Crochet Go Your Own Way Cardigan
by City Farmhouse Studio
Get the printable PDF version of the pattern (without ads) HERE
Add it to your Ravelry queue HERE
Lion Brand Shawl in a Ball – Category 4 – 58% Cotton, 39% Acrylic, 3% Other Fiber – 5.3oz/150g, 481yd/440m – Soothing Blue – skeins needed 4 (4, 5, 5) 6, 6 [7, 7, 8] – get it HERE
Alternative suggested yarns for substitution: Lion Brand Mandala, Red Heart Roll With It Sparkle, Hobbii Universe XL
Crochet Hook I (5.5 mm)
Stitch Markers
Sizes: XS (S, M, L) XL, 2X [3X, 4X, 5X]
(model in images has 35” dia bust and wearing a size S)
Finished garment back width: 18.5 (20, 22 ½, 24) 26 ½, 28 [30 ½, 33 ¼, 36 ½] inches
Finished garment length: 24 (24, 25, 25) 29, 29 [29, 30, 30] inches
Gauge: 4 round block = 3 ½” x 3 ½” square
5 round block = 4 ½” x 4 ½” square
Notes:
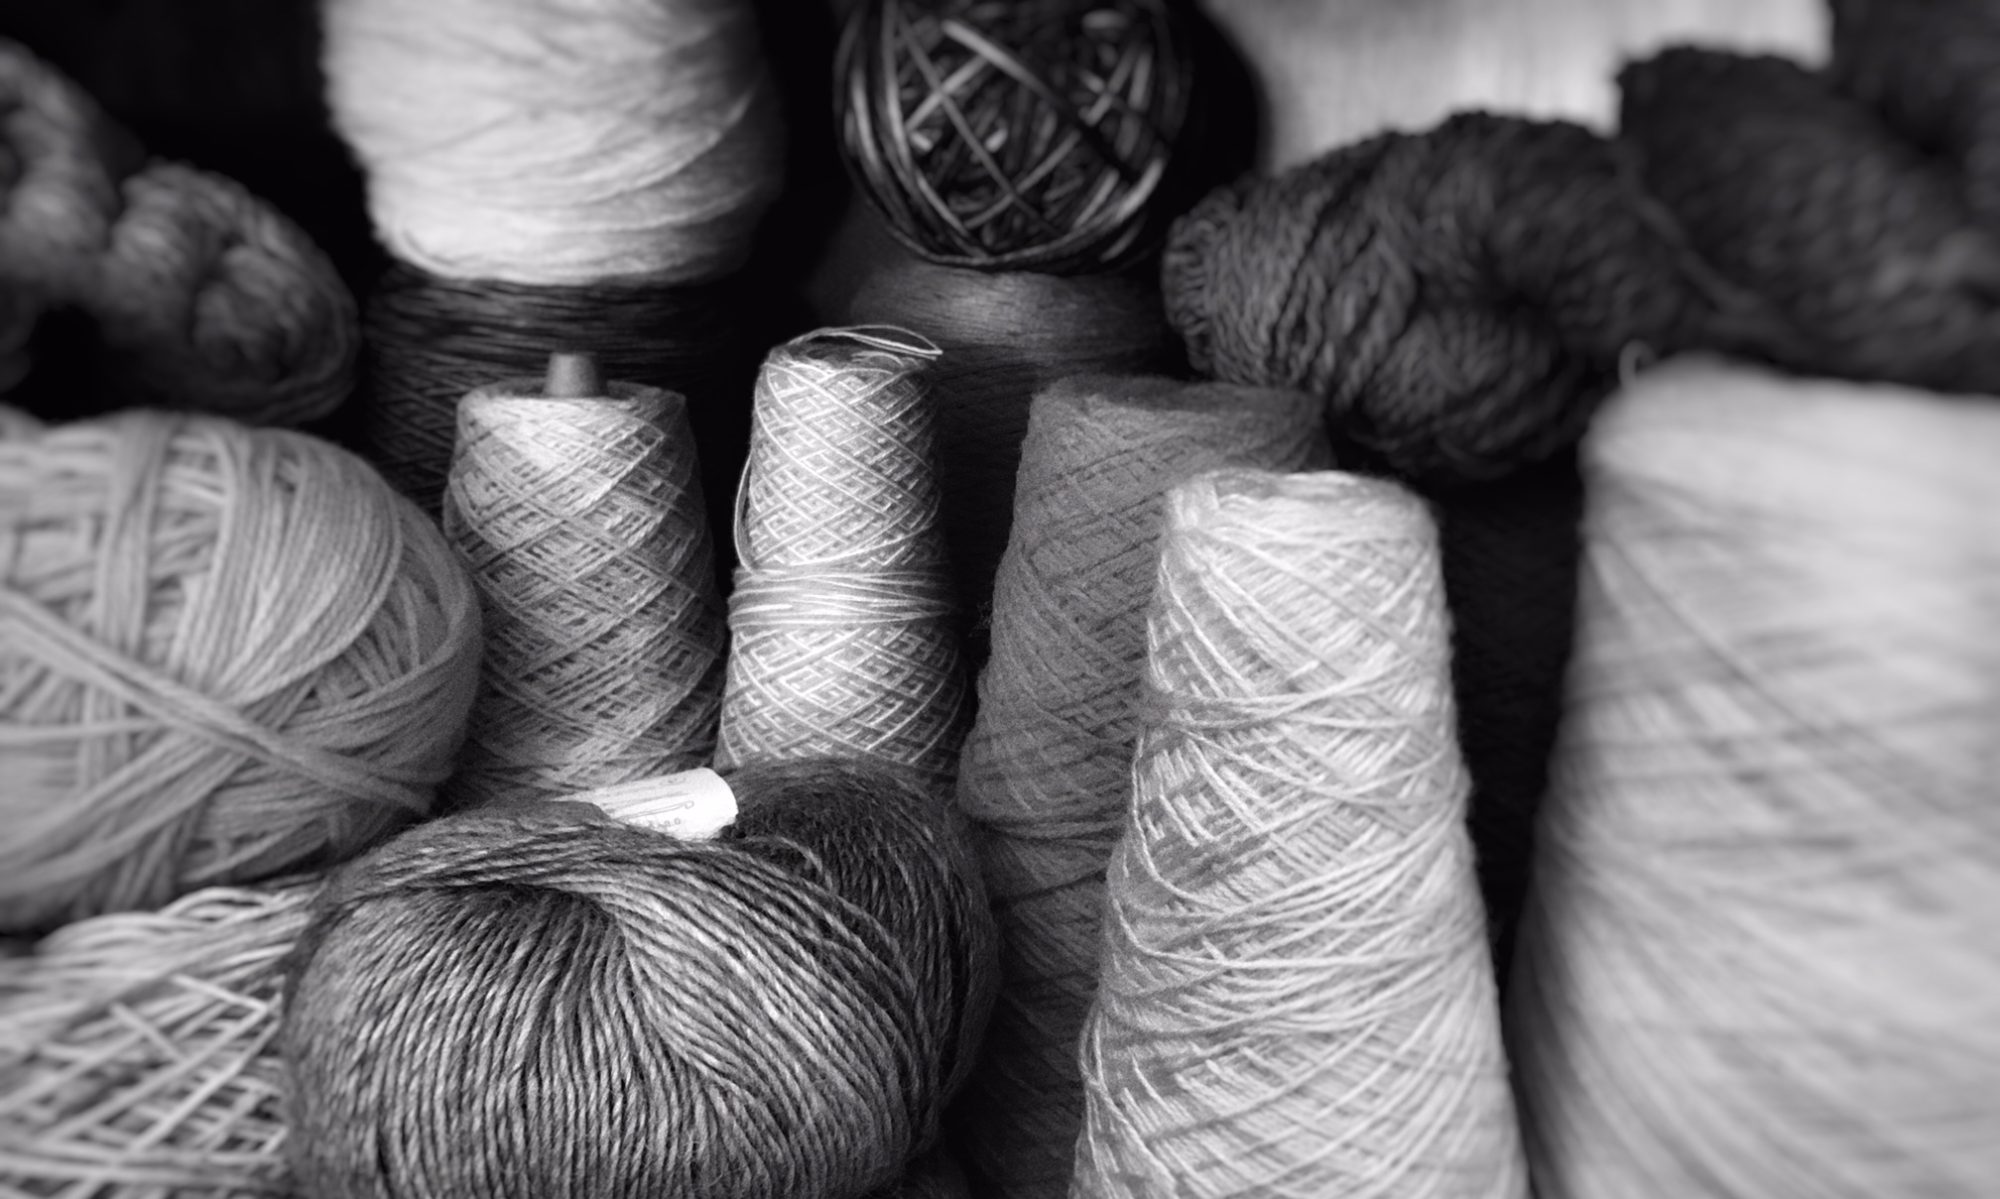
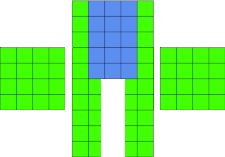
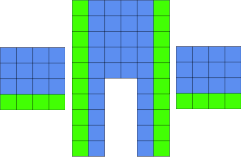
To determine your size, reference your back width and the amount of ease you wish to have. Find your size layout below, and note how many blocks you need to make of each size. Make the according amount by referencing instructions for blocks, and narrow blocks.
Blocks are made primarily of puffs. To make a puff:
*Yarn over and insert hook into designated space. Yarn over and pull up loop (about the height of 2 chains).* Repeat from * to * for a total of 4 times. Draw loop through all loops on hook. Ch 1.
A YouTube video showing how to create each block, join each motif, and create the borders can be found at https://youtu.be/slYzRXXe7Xs

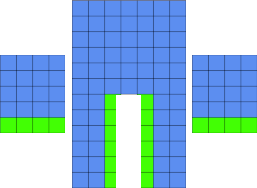
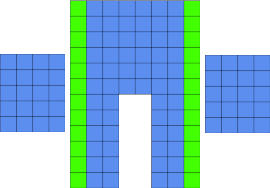
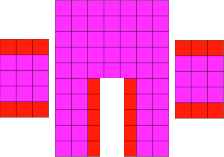
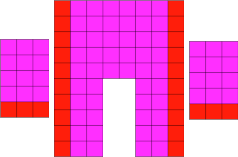
= 4 rounds square block
= 4 rounds narrow block
= 5 rounds square block
= 5 rounds narrow block
*** Blocks and images are not to scale. They are reference only ***
Description of parts in layout:

XS:

= 15 blocks of 4 rounds square block
= 62 blocks of 4 rounds narrow block
S:

= 51 blocks of 4 rounds square block
= 26 blocks of 4 rounds narrow block
M:
= 54 blocks of 4 rounds square block
= 28 blocks of 4 rounds narrow block
L:

= 92 blocks of 4 rounds square block
XL:

= 66 blocks of 4 rounds square block
= 52 blocks of 4 rounds narrow block
2X:
= 98 blocks of 4 rounds square block
= 20 blocks of 4 rounds narrow block
3X:
= 100 blocks of 4 rounds square block
= 24 blocks of 4 rounds narrow block
4X:

= 73 blocks of 5 rounds square block
= 22 blocks of 5 rounds narrow block
5X:
= 74 blocks of 5 rounds square block
= 26 blocks of 5 rounds narrow block
4 and 5 Rounds Square Block:
Rnd 1: Beginning with a slip knot on hook, create a magic loop, slip stitch around loop. Chain 2. *Yarn over, insert hook into magic loop, yarn over and pull up another loop the height of the chain 2.* Repeat for a total of 3 times. Yarn over and draw loop through all loops on hook. Ch 1. Counts as first puff. Make 7 puffs as described in notes. Tighten magic loop. Slip stitch through top loop of first puff of round to end round.
Rnd 2: Ch 2 and turn. Yarn over and in between first and last puff of previous round *yarn over and pull up another loop the height of the chain 2.* Repeat for a total of 3 times. Draw a loop through all loops on hook. Ch 1. Counts as first puff of round. Make 1 puff in next space between previous round’s puffs. Dc in top of puff in previous round. [Make puff in each of the next two spaces between puffs of previous round. Dc in top of puff in previous round. Repeat from [ to ] for a total of 3 times. Slip stitch through top loop of first puff to close round.
Rnd 3: Ch 2 and turn. Yarn over and in between first and last puff of previous row *yarn over and pull up another loop the height of the chain 2.* Repeat for a total of 3 times. Draw loop through all loops on hook. Ch 1. Counts as first puff of round. Make 1 puff in each of the next 2 spaces of the previous round. Dc, ch1, dc, ch1 in top of the dc in the previous round. [Make a puff in each of the next 3 spaces between puffs of previous row. Dc, ch1, dc, ch1 in top of dc in previous round.] Repeat from [ to ] for a total of 3 times. Slip stitch through top loop of first puff to close round.

Rnd 4: Ch 2 and turn. Yarn over and in between first and last puff of previous row *yarn over and pull up loop the height of the chain 2.* Repeat for a total of 3 times. Draw loop through all loops on hook. Ch 1. Counts as first puff of round. Make 1 puff in each of the next 3 spaces of the previous round. Dc, ch1, dc, ch1 in the space between the two dc of the previous round. [Make a puff in each of the next 4 spaces between puffs of previous round. Dc, ch1, dc, ch1 in the space between the two dc of the previous round.) Repeat from [ to ] for a total of 3 times. Slip stitch through top loop of first puff to close round.
For motifs of 4 rounds bind off, for 5 round motifs proceed to next rnd.
Rnd 5: Ch 2 and turn. Yarn over and in between first and last puff of previous row *yarn over and pull up loop the height of the chain 2.* Repeat for a total of 3 times. Draw loop through all loops on hook. Ch 1. Counts as first puff of round. Make 1 puff in each of the next 4 spaces of the previous round. Dc, ch1, dc, ch1 in the space between the two dc of the previous round. [Make a puff in each of the next 5 spaces between puffs of previous row. Dc, ch1, dc, ch1 in the space between the two dc of the previous round.] Repeat from [ to ] for a total of 3 times. Slip stitch through top loop of first puff to close round. Bind off.
4 and 5 Rounds Narrow Block:
These blocks are very similar to the above blocks, except half of the sides will have one less puff.
Beginning with a slip knot on hook , create a magic loop, slip stitch around loop. Chain 2. *Yarn over, insert hook into magic loop, yarn over and pull up another loop the height of the chain 2.* Repeat for a total of 3 times. Yarn over and draw loop through all loops on hook. Ch 1. Counts as first puff. Make 5 puffs as described in notes. Tighten magic loop. Slip stitch through top loop of first puff of round to end round.
Rnd 2: Ch 2 and turn. Yarn over and in between first and last puff of previous round *yarn over and pull up loop the height of the chain 2.* Repeat for a total of 3 times. Draw loop through all loops on hook. Ch 1. Counts as first puff of round. Make 1 puff in next space between previous round’s puffs. Dc in top of puff in previous round. Make a puff in the next space between puffs of previous round. Dc in top of puff in previous round. Make 1 puff in each of the next 2 spaces between previous round’s puffs. Dc in top of puff in previous round. Make a puff in the next space between puffs of previous round. Dc in top of puff in previous round. Slip stitch through top loop of first puff to close round.
Rnd 3: Ch 2 and turn. Yarn over and in between first and last puff of previous round *yarn over and pull up loop the height of the chain 2.* Repeat for a total of 3 times. Draw loop through all loops on hook. Ch 1. Counts as first puff of round. Make 1 puff in each of the next 2 spaces between previous round’s puffs. Dc, ch1, dc, ch1 in top of dc in previous round. Make 1 puff in each of the next 2 spaces between previous round puffs. Dc, ch1, dc, ch1 in top of dc in previous round. Make 1 puff in each of the next 3 spaces between previous round’s puffs. Dc, ch1, dc, ch1 in top of dc in previous round. Make 1 puff in each of the next 2 spaces between previous round’s puffs. Dc, ch1, dc, ch1 in top of dc in previous round. Slip stitch through top loop of first puff to close round.
Rnd 4: Ch 2 and turn. Yarn over and in between first and last puff of previous round *yarn over and pull up loop the height of the chain 2.* Repeat for a total of 3 times. Draw loop through all loops on hook. Ch 1. Counts as first puff of round. Make 1 puff in each of the next 3 spaces between previous round’s puffs. Dc, ch1, dc, ch1 in the space between the two dc of the previous round. Make 1 puff in each of the next 3 spaces between previous round’s puffs. Dc, ch1, dc, ch1 in the space between the two dc of the previous round. Make 1 puff in each of the next 4 spaces between previous round’s puffs. Dc, ch1, dc, ch1 in the space between the two dc of the previous round. Make 1 puff in each of the next 3 spaces between previous round’s puffs. Dc, ch1, dc, ch1 in the space between the two dc of the previous round. Slip stitch through top loop of first puff to close round.
For motifs of 4 rounds bind off, for 5 round motifs proceed to next rnd.
Rnd 5: Ch 2 and turn. Yarn over and in between first and last puff of previous round *yarn over and pull up loop the height of the chain 2.* Repeat for a total of 3 times. Draw loop through all loops on hook. Ch 1. Counts as first puff of round. Make 1 puff in each of the next 4 spaces between previous round puffs. Dc, ch1, dc, ch1 in the space between the two dc of the previous round. Make 1 puff in each of the next 4 spaces between previous round’s puffs. Dc, ch1, dc, ch1 in the space between the two dc of the previous round. Make 1 puff in each of the next 5 spaces between previous round’s puffs. Dc, ch1, dc, ch1 in the space between the two dc of the previous round. Make 1 puff in each of the next 4 spaces between previous round’s puffs. Dc, ch1, dc, ch1 in the space between the two dc of the previous round. Slip stitch through top loop of first puff to close round. Bind off.
Join Blocks
Weave in all ends of blocks. Lay all completed blocks in layout as described for your size. If there are narrow blocks, the narrow edge will be at the top and bottom of the block. Rearrange blocks as necessary for desired patchwork effect with the colors.
Starting at a bottom edge, with a slip knot on your hook, insert into a corner ch space of a block on the left of the join. Create a slip stitch. Ch1. Yarn over hook and insert into opposing block corner ch space. Yarn over and pull up loop, yarn over and pull through 2 loops on hook. Yarn over and pull through last 2 loops on hook.
In first block worked, yarn over and insert hook into top of dc along join edge. Yarn over and pull up loop, yarn over and pull through 2 loops on hook. Yarn over hook and insert into opposing block dc. Yarn over and pull up loop, yarn over and pull through 2 loops on hook. Yarn over and pull through last 2 loops on hook. This stitch is like a dc2together, except the stitches lie across from each other instead of next to each other.
Proceed down the blocks using this dc2together going from space to space and puff to puff, stopping after the first dc of the next corner of the same blocks.
In first block worked, yarn over and insert hook into the corner ch space. Pull up loop, yarn over and pull through 2 loops on hook. Yarn over hook and insert into the next block to be worked on the opposing corner (the corner of the block previously worked will be left unworked at this point). Yarn over and pull up loop, yarn over and pull through 2 loops on hook. Yarn over and pull through last 2 loops on hook.
Moving to next block to be worked on the same side as the starting block, yarn over and insert hook into top of dc along join edge. Pull up loop, yarn over and pull through 2 loops on hook. Yarn over hook and insert into opposing block dc. Yarn over and pull up loop, yarn over and pull through 2 loops on hook. Yarn over and pull through last 2 loops on hook.
Proceed down the row using this join, moving diagonal at the corners, and then aligning at the next dc. End the row with a join at the last blocks’ corner spaces.
Repeat joining blocks moving in the same direction as the first row. Once all is complete work join rows that run in the opposite direction. Start the edge so your corner joins will connect the unworked corner spaces of the blocks.
The edges of the narrow blocks at the front opening will not join to the back.
Depending on sleeve layout, the blocks may not align to the front and back panels. If this is the case, join the sleeve blocks all together. Then, with the top of the sleeve aligned to the shoulder join, count stitches evenly down to the starting edge of the sleeve. Join working opposing stitches, puffs or spaces together in a fashion as previously worked for the dc2together.
Join with the dc2together as used on all blocks to connect the sleeve edges together. Continue connecting the sides of the body if not already connected.
All blocks should be joined together to form basic shape of cardigan.
Edge Banding
Place 2 stitch markers in each bottom front opening corner space. Place 1 stitch marker in the center of the back neck opening. Place 1 stitch marker in the middle of each of the shoulder seam joins (where the back panel meets the front).
If you still have a live stitch at the join, continue on to next paragraph. If you bound off the edge where the front and back panel join: With a slip knot on hook, insert hook into center join of the back to front panel at the side and make one slip stitch.
Ch2. Dc in each space and stitch of each motif. Dc in each corner space of each motif, and make 3 dc evenly through each join section. When you get to the first bottom edge corner, make 2 dc in the stitch before the stitch that has 2 stitch markers. Make 4 dc in the stitch that is marked. Place one stitch marker into the center two dc that were just made. Make 2 dc in the next stitch. One stitch marker will always mark the last stitch of the bottom hem, and the other will mark the last stitch of the front opening.
For sizes M, L, 3X, 4X, 5X: Continue dc in each space and stitch around. Move stitch markers around neck to the stitch just made in that marked stitch. Work around to next corner. Make 2 dc in the stitch before the stitch that has 2 stitch markers. Make 2 dc in the first marked stitch. Place one stitch marker into the last dc made. Make 2 more dc in the next marked stitch. Place a stitch marker in the first dc made. Make 2 dc in the next stitch. Continue dc in each space around. Slip stitch in first dc made.
For sizes XS, S, XL, 2X: Continue dc in each space and stitch around. Make 3 dc in each of the spaces with a stitch marker around the neck. Move the stitch marker to the center dc of the three just made. Continue dc in each space and stitch along front edge. Make 2 dc in the stitch before the stitch that has 2 stitch markers. Make 2 dc in the first marked stitch. Place one stitch marker into the last dc made. Make 2 more dc in the next marked stitch. Place a stitch marker in the first dc made. Make 2 dc in the next stitch. Continue dc in each space around. Slip stitch in first dc made.
For all sizes: Ch2 and turn. Dc in the front loop of each stitch of previous row. When you get to the first bottom edge corner, make 2 dc in the front loop of the stitch before the first stitch marker. Make 2 dc in the front loop of the stitch that is marked. Place one stitch marker into the last dc made. Make 2 dc in the front loop of the next stitch. Place one stitch marker into the first dc made. Make 2 dc in the front loop of the next stitch. Continue dc in each front loop around. Make 3 dc in each of the front loops of the stitches with a stitch marker around the neck. Move the stitch marker to the center stitch just made. Continue dc in each front loop along the front edge. Make 2 dc in the front loop before the stitch marker. Make 2 dc in the stitch that is marked. Place one stitch marker into the last stitch. Make 2 dc in the next stitch. Place one stitch marker into the first dc. Make 2 dc in the front loop of the next stitch. Continue dc in each space around. Slip stitch in first dc made.
Continue repeating above step until you have 8 (8, 8, 8) 8, 8 [10, 10, 10] rows of dc. Bind off.
Cuffs
With a slip knot on hook, slip stitch through the center of a join on sleeve edge. Ch 1. Yarn over hook, and insert into next space of join. Yarn over and pull up a loop. Yarn over and draw through 2 loops on hook. Yarn over and draw through 2 loops on hook. One stitch decrease made. Continue around sleeve edge decreasing with dc2together. To make a dc2together, yarn over hook and insert into next stitch or space. Yarn over and pull up a loop. Yarn over and draw through 2 loops on hook as if creating the first portion of a dc. Yarn over and insert into next stitch. Yarn over and pull up a loop. Yarn over draw through 2 loops, again like the first portion of a dc. Yarn over and draw through 2 loops on hook to create the decrease. Repeat through all of the edges. Slip stitch in top of first decrease of round.
Ch 2 and turn. Dc in each front loop around. Slip stitch in first dc of round. Repeat until you have 8 (8, 10, 10) 10, 10 [10, 12, 12] rows of dc. Bind off. Weave in all ends.
Discover more from City Farmhouse Studio
Subscribe to get the latest posts sent to your email.
This is so timely! I am trying to clear out some boxes of yarn and having a hard go of passing on my orange and brown bits. Thank-you so much!
I think we all have a hard time of letting go of yarn!
Let me know how it turns out!