
I wear a lot of cardigans. Pretty much, if you see me “dressed” up then I have some sort of cardigan on. Being a jeans and t-shirt kind of gal, a cardigan is a way I have found to wear what I’m comfortable in and still look like a grown up.
Also, if you ever see me in a dress chances are I’m also wearing a cardigan. Since a majority of the dresses I own are sleeveless; a cardigan has been a necessity for me not to freeze during any occasion – except for outdoor weddings in the summer. Don’t ask me why I own sleeveless dresses if I’m always cold, maybe it is just a way for me to wear a cardigan.
This pattern came about from two cardigans I own that I liked different aspects of each, and the need to make one for a new sleeveless dress I’m wearing for events during this upcoming holiday season.
note: this page contains affiliate links

One of the cardigans is fitted with this large fold over collar that runs around the front edge. It is a suede-like fabric and a muted purple. I love wearing it in the winter and I always feel put together in it.
The other is a knit cardigan that my mother-in-law got me. It is a mid-thigh length that is loose and flowy with a very large knit lace edging for the trim. It has a much more relaxed fit that I love with skinny jeans and a tee. I also like the way the lace edging adds a lot of detail to an otherwise simple stockinette garment.

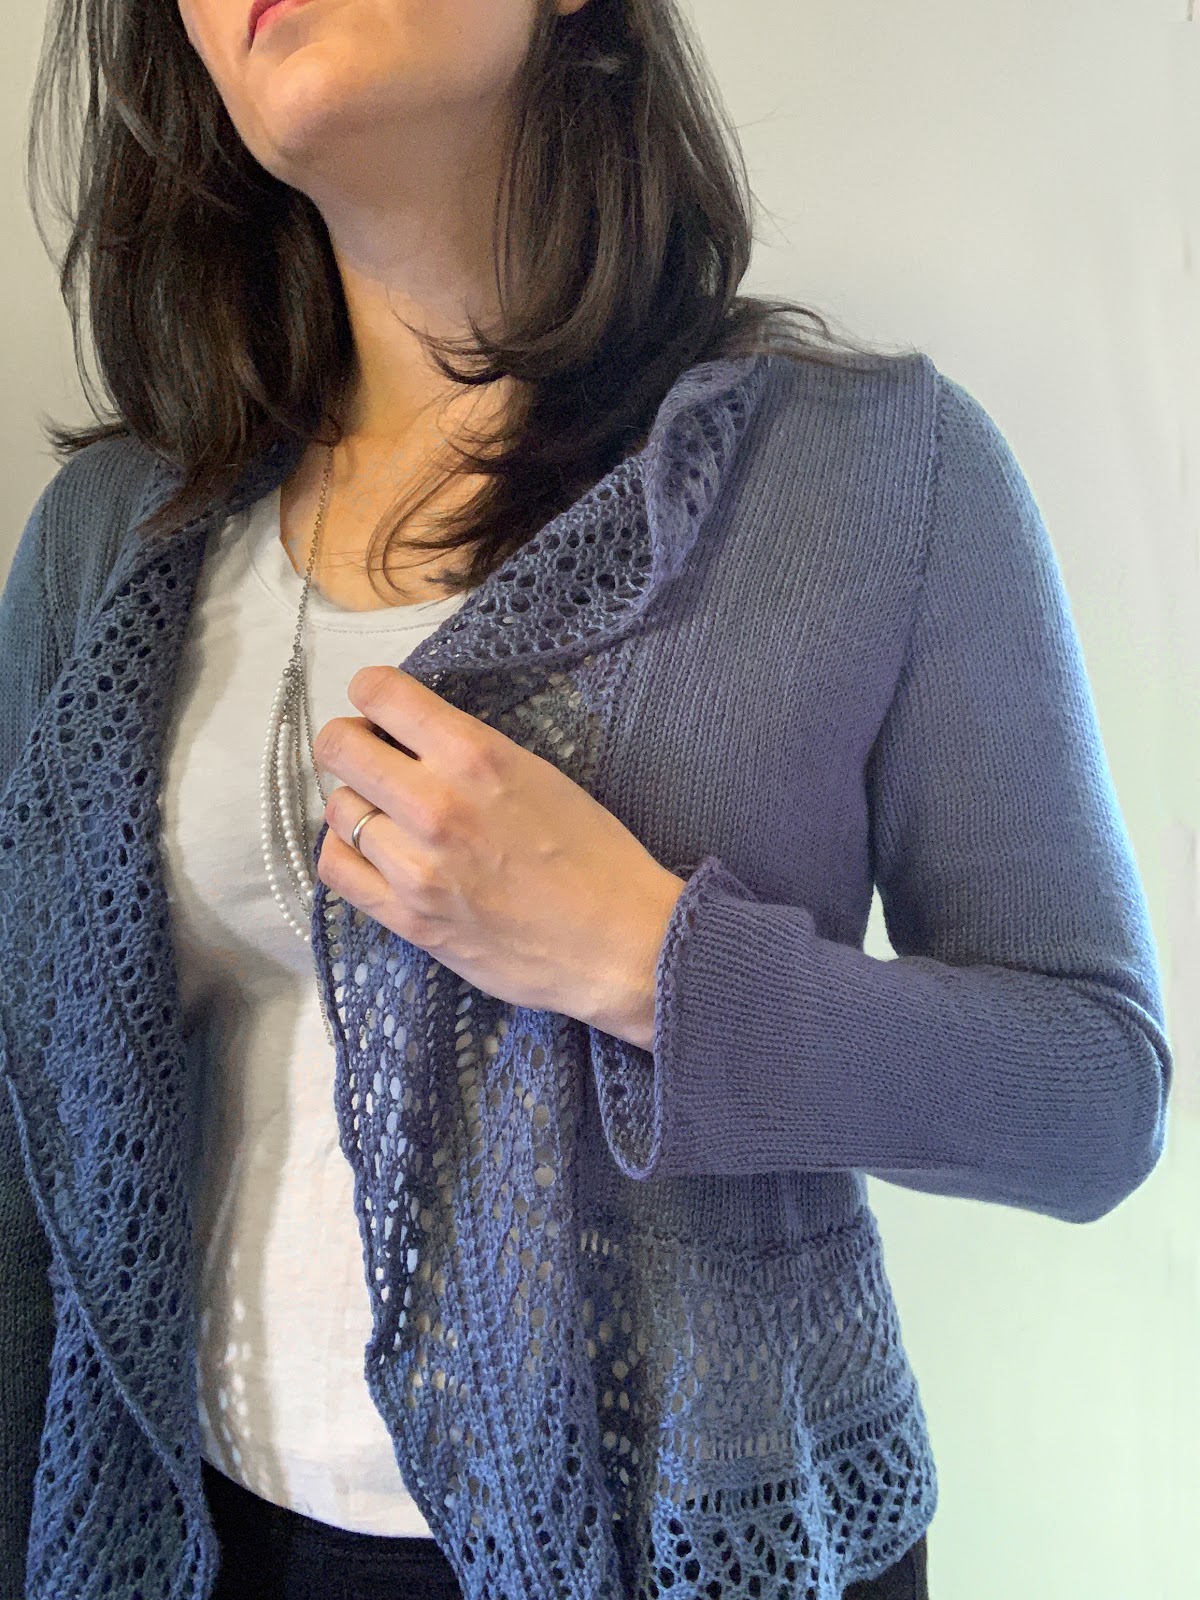
The dress I bought has a tailored button up bodice and a flowing a-line skirt. With it being sleeveless I knew I would need a cardigan. Taking cues from the structure and fit of the first cardigan and dressing it up with the idea of lace edging is how the Lace Rhapsody pattern came to be. To add a little extra to the sleeves I added an eyelet at the cuff to coordinate with the lace work of the edging.
For the sizing, the finished bust measurements do appear larger than regular bust measurements for the sizes. However, the amount for the drape of the lace and the amount of garment ease both add to the finished garment size.
Also, the sleeves are designed to be 22.5″ long for all sizes. After looking at women on the street, I have seen all different proportions of arm length to garment size proportions. Adjust the rows between the increases according to your desired sleeve length. Adding or removing any in the sleeve cap will impact how the sleeve sews into the garment body.

I’m excited about wearing this cardigan all dressed up with a dress for our upcoming holiday events, and with jeans and a tee-shirt for a date night with my husband. I hope you find this cardigan as versatile and a new staple for your wardrobe as much as I have.
Women’s Knit Lace Rhapsody Cardigan
by City Farmhouse Studio
See the machine knitting version of the pattern HERE
Get the printable PDF version of the pattern (without ads) HERE
Add it to your Ravelry queue HERE
Loops and Threads – Woolike Yarn – 2, 2, 2, 3, 3, 3, 3, 3, 3 skeins
3.5mm (US4) needles
Sizes: XS, S, M, L, XL, 2X, 3X, 4X, 5X
Finished garment bust measurements: XS=37″, S=40″, M=43″, L=46″, XL=49″, 2X=52″, 3X=55″, 4X=58″, 5X=62″
Gauge:
4” x 4” = 28 x 36 rows stockinette
Front – Cast on 40, 46, 52, 57, 63, 69, 74, 80, 86
Knit in stockinette 7.5, 7.75, 8, 8.25, 8.5, 8.5, 8.75, 9, 9.25 inches ending with a wrong side row.
Bind off 5, 6, 7, 7, 8, 10, 10, 11, 12 stitches. Work 2, 2, 2, 1, 1, 1, 1, 1, 1 rows.
(Sts 35, 40, 45, 50, 55, 59, 64, 69, 74)
*Bind off 1 st on same edge as previous decrease every 2, 2, 2, 1, 1, 1, 1, 1, 1 rows.*
Repeat from *to* 6, 11, 13, 3, 6, 5, 9, 12, 13 times.
(Sts 29, 29, 32, 47, 49, 54, 55, 57, 61)
*Bind off 1 st on same edge as previous decrease every 3, 3, 3, 2, 2, 2, 2, 2, 2 rows.*
Repeat from *to* 5, 2, 1, 13, 13, 13, 11, 10, 10 times.
(Sts 24, 27, 31, 34, 36, 41, 44, 47, 51)
Knit in stockinette 13, 11, 9, 9, 5, 5, 4, 2, 0 rows.
*Bind off on opposite side than previous 1 st every 5, 4, 3, 2, 2, 2, 2, 1, 1 rows.*
Repeat from *to* 2, 4, 6, 2, 6, 10, 14, 1, 2 times.
(Sts 22, 23, 25, 32, 30, 31, 30, 46, 49
*Bind off as same side as step above 1 st every 6, 5, 4, 3, 3, 3, 3, 2, 2 rows. *
Repeat from *to* 3, 3, 3, 9, 7, 5, 3, 18, 19 times.
(Sts 19, 20, 22, 23, 23, 26, 27, 28, 30)
Knit in stockinette 8, 8, 13, 15, 17, 18, 20, 23, 24 rows.
Bind off.
Repeat instructions for front but ending with a right side row.
Back – Cast on 124, 134, 144, 154, 164, 174, 186, 196, 206
Knit in stockinette 7.5, 7.75, 8, 8.25, 8.5, 8.5, 8.75, 9, 9.25 inches ending with a wrong side row.
Bind off 5, 6, 7, 8, 8, 9, 10, 11, 11 sts, knit the rest of the row.
Bind off 5, 6, 7, 8, 8, 9, 10, 11, 11 sts, purl the rest of the row.
*Bind off 1 st on both edges every 2, 2, 1, 1, 1, 1, 1, 1, 1 rows.*
Repeat from *to* 9, 11, 1, 2, 5, 6, 11, 12, 16 times.
(Sts 96, 100, 128, 134, 138, 144, 144, 150, 152)
*Bind off 1 st on both edges every 3, 3, 2, 2, 2, 2, 2, 2, 2 rows.*
Repeat from *to* 3, 2, 13, 13, 12, 12, 10, 10, 8 times.
(Sts 90, 96, 102, 108, 114, 120, 124, 130, 136)
Knit in stockinette 5.25, 5.5, 6, 6, 6.25, 6.5, 6.5, 6.75, 7 inches.
Bind off.
Sleeve (make 2) – Cast on 51, 53, 55, 57, 59, 61, 63, 65, 67 sts.
Starting with a purl row, work 3 rows of stockinette.
Knit the first sitch. (Yo, k2tog) to end to create eyelets.
Knit in stockinette 6, 5, 5, 4, 4, 3, 3, 3, 2 rows.
*Add one stitch on each side every 7, 7, 5, 5, 5, 4, 4, 4, 3 .*
Repeat from *to* 15, 6, 2, 10, 19, 8, 16, 23, 2 times.
(Sts 81, 65, 59, 77, 97, 77, 95, 111, 71.)
*Add one stitch on each side every 8, 7, 6, 6, 6, 5, 5, 5, 4.*
Repeat from *to* 3, 12, 19, 12, 4, 16, 10, 4, 26 times.
(Sts 87, 89, 97, 101, 105, 109, 115, 119, 123.)
Knit in stockinette 0, 2, 2, 2, 2, 8, 2, 3, 2 rows.
Bind off 6, 6, 7, 8, 8, 10, 10, 11, 11. Work the rest of the row in stockinette.
Bind off 6, 6, 7, 8, 8, 10, 10, 11, 11. Work the rest of the row in stockinette.
*Bind off 1 st on each edge every 1, 1, 1, 2, 2, 2, 2, 2, 2 rows.*
Repeat from *to* 1, 1, 1, 8, 8, 8, 9, 9, 9 times.
(Sts 73, 75, 81, 69, 73, 73, 77, 79, 83)
*Bind off 1 st on each edge every 2, 2, 2, 4, 4, 4, 4, 4, 4 rows.*
Repeat from *to* 7, 7, 7, 2, 2, 2, 4, 4, 4 times.
(Sts 59, 61, 67, 65, 69, 69, 69, 71, 75)
*Bind off 1 st on each edge every 3 rows.*
Repeat from *to* 9, 10, 10, 9, 10, 10, 8, 8, 9 times.
(Sts 41, 41, 47, 47, 49, 49, 53, 55, 57)
*Bind off 1 st on each edge every 2 rows.*
Repeat from *to* 8, 8, 9, 7, 8, 9, 9, 9, 10 times.
(Sts 25, 25, 29, 33, 33, 31, 35, 37, 37)
*Bind off 1 st on each edge every 1 row.*
Repeat from *to* 3, 2, 3, 4, 3, 2, 2, 2, 1 times.
(Sts 19, 21, 23, 25, 27, 27, 31, 33, 35)
Bind off.
Sew shoulders together using an equal number of stitches of back panel as there are on each front panel. Sew sleeves onto front and back panel. Sew up sleeve and side edges.
Lace Panels for bottom and front edge of cardigan – for all sizes cast on 26 and purl one row.
Row 1: K7, yo, k2tog, k2, yo, k2tog, k6, yo, k2tog, k2, yo, k2tog, k1.
Row 2: P9, yo, p2tog, yo, p2tog, p8, yo, p2tog, yo, p2tog, p1.
Row 3: K8, yo, k2tog, k1, yo, k2tog, k7, yo, k2tog, k1, yo, k2tog, k1.
Row 4: P7, yo, p2tog, p2, yo, p2tog, p6, yo, p2tog, p2, yo, p2tog, p1.
Row 5: K9, yo, k2tog, yo, k2tog, k8, yo, k2tog, yo, k2tog, k1.
Row 6: P8, yo, p2tog, p1, yo, p2tog, p7, yo p2tog, p1, yo, p2tog, p1.

Repeat row 1-6 for desired rows:
For bottom edging knit pattern for 29, 32, 35, 38, 41, 44, 47, 51, 54 inches.
Work 1 row plain. Bind off.
For side edgings knit two panels, each 23.5, 25, 26, 26.5, 27, 28, 29, 30, 30.5 inches.
Work 1 row plain. Bind off. Sew two ends of together so pattern is mirror image.
Attach bottom lace to bottom edge of cardigan.
Align side lace to be centered in the center of the back neck edge and to the bottom corner of lace edge previously attached. Secure around.
Hello Cathy!
Thanks for sharing this pattern. i am trying to knit this as a gift for my daughter (medium size). In trying to follow the pattern I am having a bit of trouble with the instructions to bind off. Could you please help?
1, Bind off 7 stitches. Work 2 rows. (Sts 35, 40, 45, 50, 55, 59, 64, 69, 74)
I should knit 2 rows – correct?
2. Bind off 1 st on same edge as previous decrease every 2 rows.* Repeat from *to* 13 times. (Sts 29, 29, 32, 47, 49, 54, 55, 57, 61)
I should knit 26 rows – correct?
3. Bind off 1 st on same edge as previous decrease every 3 rows.* Repeat from *to* 1 times. (Sts 24, 27, 31, 34, 36, 41, 44, 47, 51)
I should knit 3 rows – correct?
4. Knit in stockinette 9 rows.
Is this 9 rows after the 3 rows above? So in essence 11 tows stockinette after the one I bind off?
5. Bind off on opposite side than previous 1 st – this means purl if the previous ones fit all binding on the purl – so now that I have to knit one extra row to get to the other side?
Also every 3 rows.* Repeat from *6, times. (Sts 22, 23, 25, 32, 30, 31, 30, 46, 49
This means 18 rows?
5. Bind off as same side as step above – so is this knit or purl? 1 st every 4 rows. Repeat from *to* 3 times. (Sts 19, 20, 22, 23, 23, 26, 27, 28, 30)
So this will be another 12 rows?
I am worried that I am doing this wrong and don’t want to go too far without checking in.
I hope you can reply. Thanks again in advance!
Arty
Hi Arty, thanks for reaching out for clarification. For your 1-4 your understanding and math is correct. Turn all your questions into statements!
For the #5, know the first set of bind offs are for your arm openeing. After the additional 9 rows of stockinette you start decreasing at the front opening edge for the neck. So, whatever row it has you on to begin your decrease – doesn’t matter if it is a knit or purl row – you need to see what edge you had been decreasing on previously, and then make one decrease on the other edge. Like before, the 3 rows includes the row that you made the 1st decrease, and you have the 18 rows correct.
The last set of bind offs is to continue decreasing for the neck just like above, but it is every 4 rows instead of 3. Yes, 12 rows total.
I hope this clarifies the steps. Please let me know if you have any further – Cathy
Thanks so much, Cathy. I was worrying this was getting too long but I appear to be following along correctly. I’ll keep you posted.
Thanks again!
Arty
It’s Beautiful. Another question about decreasing on the front. I’m trying t o make the XS. I understand dec every 2 rows but how do you dec every 3 rows and still be on the same side as previous decrease?
(I hope you are still monitoring your comments.) Thanks
Hi Cheri. Depending on the row you will be decreasing at the beginning or at the end of the row that needs the decrease on.
Quick response but here is where I am perplexed:
*Bind off 1 st on same edge as previous decrease every 2, 2, 2, 1, 1, 1, 1, 1, 1 rows.* You said this means to complete the bind off row and work the next row.
But the next instruction says:
*Bind off 1 st on same edge as previous decrease every 3 rows ( for XS)
So if I bind off 1 st, finish that row and work the next 2 rows the bind off won’t be on the same edge as the previous decreases. I am apparently misinterpreting this.
Can you clarify it for me.? As I mentioned, I am making the XS size.
So the explanation you gave for the bind off/decrease every two rows is correct for your size. You are correct that on the beginning of the next row where you would bind off you would be starting at the opposite edge of where you previously decreased. When this happens, work the length of the row until the last two stitches so that you can decrease at the same edge that you had previously been decreasing. You have several options for how to bind off (or decrease) one stitch. I always do what is easiest and quickest for me – knit/purl 2 together. I know that these stitches will be in the inside of the seam and not visible so I don’t worry about which way the stitch slants. If you prefer you could ssk or ssp as needed for the correct slant of the stitch. How you complete the bind off/decrease is your preference. What is important is that it is on the same side for the armhole shaping.
I LOVE this sweater and bought the yarn to make it during the pandemic isolation. I have a question about the directions. When you begin to decrease on the armhole side, the directions say to either decrease after one row or two rows. If you decrease after ONE row, you are not on the armhole side so you would have to do TWO rows. I am making the Medium sweater, so do I knit(purl) 4 rows before a decrease? Thank you for helping me.
Hi Fran, I am glad you are liking my sweater pattern. For the different sizes on the next decrease rows after the first bind off you would have to decrease possibly on the beginning or end of the row. For size medium you bind off 7 stitches, and work that row. Work one more row even. That would make your two rows in the instructions. For the next instructions you will be decreasing one stitch at the beginning of the first row you work, working one more row even. Those two rows would be repeated until you have 32 stitches. The other sizes would be decreasing a stitch at the end of their first row, and then the beginning of their next so that it stays on that same side for the armhole. I hope that clarifies the instructions, please let me know if you have any further questions. Cathy
Its gorgeous. I’m going to try it.
If the lace adds to the size, how do you know what size to make? Love this design! And thank you for making it in an affordable yarn!
Hi, and I’m glad you like the design. I too am on a budget so can’t be spending hundreds of dollars on one sweater, so glad you feel the same way. For the size to make that will be preference. In the pictures the size I’m wearing is 1 1/2″ larger than my bust. As you can see it isn’t all that loose of a fit since the front lays open and drapes slightly down. For a more tailored fit I would go with the size that measures 1-2″ larger than your actual bust size. Add up to 2 more inches for a more relaxed fit. Hope this helps. Cathy
Love it!! Beautiful lacework & drape. Love the color too!